The
year 2012 is ending soon and I’m pretty sure, all of us are prepared to welcome
the New Year, 2013. Before we welcome the fresh year, let’s look back and enjoy
the flashbacks of 2012 and analyze the happenings so as to get ready for 2013.
A
lot of ups and downs were seen this very year. Politics in India was probably
the hottest topic, Bollywood star’s demise being the next. Not to forget the London
Olympics, and Arvind Kejriwal’s fight against corruption campaign. On a light
note, I would also count PSY’s Gangnam Style as one of the hottest trends this
year.
Moving
further to the Human Resources News in 2012, we read about the improved position
of women in the industry, decrease in salaries in banking sector, differentiated
strategies of hiring in Microsoft and Google and much other. Here,
I’m going to discuss one of the biggest revolutions made in the EPF Sector that
simplified filing of EPF Challans and saved employers from errors that used to
occur due to conventional paper work methods.
With
effect from April 2012, EPFO Launched online receipt of Electronic Challan cum
Return (ECR). Any remittance to be made by the employer was to be done only
after generating Challan from the Employer Portal of EPFO. Though every organization’s
Challans are filed this way now, a lot of employers who leave this headache on
other companies might not still be aware of this new system.
For
those who still don’t know the process, I’m explaining below all the steps
required to file Challans online through the EPF portal and those who know the
procedures already can review if they are doing everything correct.
PROCESS FLOW OF ECR
Preconditions:
1. The employer has registered his/her establishment
on the employer e-sewa portal.
2. The employer has downloaded the ECR file
format and prepared the ECR text file. (For details click here)
So, how do we file monthly Challans through EPF Portal?
1. Login
to the employer e-sewa portal here.
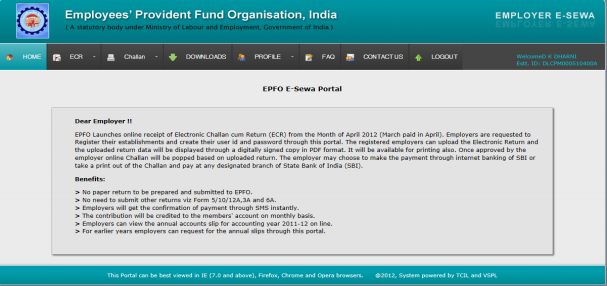
2. After
login, you’ll see the following screen
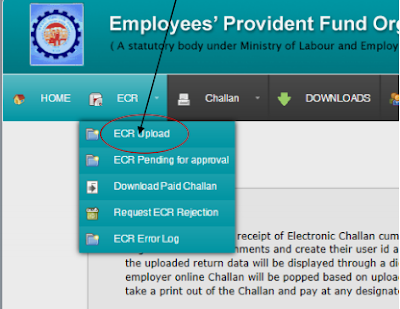
3. Click
on the ECR at the top Menu Bar. You will find the various options. Click ECR
UPLOAD.
Following screen will appear.
4. Select
the text file you have to upload from the location where you have saved it.
Check the Wage Month and year for which you are going to upload the ECR. Select
the correct WAGE MONTH/YEAR and click SUBMIT button.
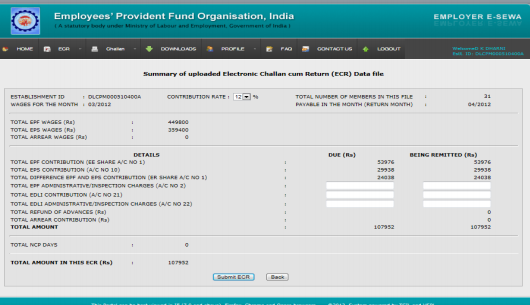
5. If
your text file has been prepared correctly, the Summary sheet as follows will
appear.
6. Enter
the additional details regarding EDLI and EPF/EDLI Administrative and
Inspection charges. Check the Contribution rate also. By default it is 12%. If
applicable for your establishment, you can change it to 10%. Click SUBMIT ECR button.
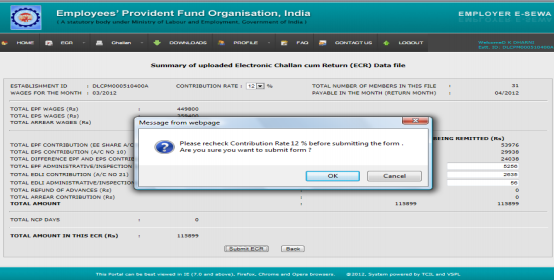
7. An
alert will appear to confirm the Contribution rate. Click OK and again click
SUBMIT ECR button.
8. A
digitally signed PDF file with date and time of upload will appear on the
screen.
Note: In case the number of
members in the ECR file is more than 200, please wait till you get an SMS alert
to view/download the digitally signed PDF file.
Click on the PDF FILE icon to download the file and verify the data with
the data of the ECR text file uploaded by you.
Note:
The PDF file that is displayed is digitally signed by EPFO for security purpose
and no signature is required.
This
step is also available at the following link (ECR PENDING FOR APPROVAL)
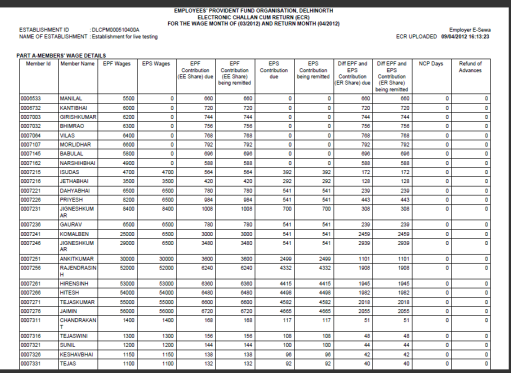
9. The
digitally signed PDF will look like the following screen.
10. After
you have satisfied yourself with the correctness of the data, click APPROVE
button. An alert will come on Approval. Click OK.
11. On
approval of the ECR file, a Temporary Return Reference Number (TRRN) for the
uploaded ECR file will be generated and the next screen that will appear will
display the Challan and Acknowledgement slip for uploaded file.
Click CHALLAN RECEIPT File for downloading and printing the Challan.
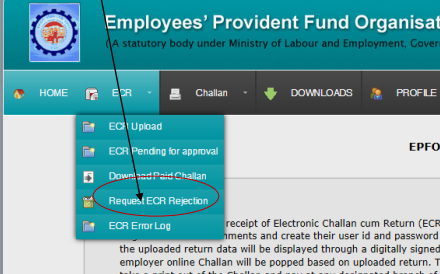
This
step is also available at the following link (REQUEST ECR REJECTION)
12. The
Challan will look as follows: After Printing, manually fill in the details
under “For establishment use only”.
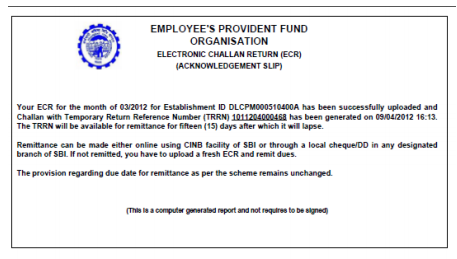
13. The
ECR Acknowledge slip will be as follows.
The challan generated on approval of
ECR will lapse after 15 days if remittance is not made.
Till this stage the
employer can request for rejection of the approved ECR. However if remittance
is made against the ECR, it cannot be rejected.
14. For
Remittance there are two options:
a. If the employer is a CINB (Corporate Internet
Banking) customer of SBI, then he/she can make online payment through the
online SBI portal of SBI.
b. Otherwise the remittance can be made through demand
draft/local cheque in any designated branch of SBI.
15. Once
the cheque against the Challan is realized, you will get SMS
alert. With this the ECR filing process for the month will be complete.
Should you have any queries regarding the
above process, please let us know. You can also share your feedback with us. We’d continue with other remarkable events
in HR Industry this Friday.









Such an Informative Article you wrote i must share it on my Linkedin and tell refer this other people who need this thing.
ReplyDeleteThank again, Beautifully explained, creatively mentioned,
Thanks Pimanpower
Such a nice and very informative blog am really appreciate to your blog thanks for sharing. Power Consultant
ReplyDeleteGreat things you’ve always shared with us. Just keep writing this kind of posts.The time which was wasted in traveling for tuition now it can be used for studies.Thanks HR consulting
ReplyDelete